If you have been using Lightroom since it’s inception it might seem absolutely natural to you and finding images is as simple as using the efficient and simple filters. If like the 90% of photographers I have worked with, Lightroom seems to have it’s own nascent (and petulant) brain that apparently throws your images away, then this article below might make some sense of Adobe’s enfant terrible and its unruly behaviour. At any rate, it might at the very least stop you from throwing your iMac through a window.
 The most important thing to realize is that Lightroom, like many other PIEware applications, doesn’t actually have a complete view of all the images on your computer’s hard drive. Rather, it only shows the images that you have imported into its catalogue. The catalogue is identified in your computer as the LRCAT (sounds like something university students do after a late night). This can complicate your view of what resides on your computer since the file structure in Lightroom can appear vastly different to the file structure on your hard drive. It doesn’t have to though. More confusingly, images you know that you have on the hard drive don’t seem to appear in Lightroom, even though you KNOW you imported them.
The first trick is knowing where the images are in your actual computer and Lightroom has several ways to identify this:
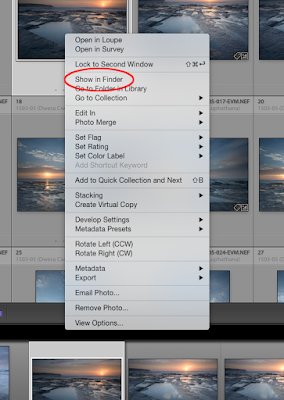
- Right click on the image inside the Library view of Lightroom and click on ‘Show Images in Finder’ - This is only really useful if you already know you have the image and it is in Lightroom, but you have no idea where Lightroom put the original photo, probably your RAW, in the first place.
- By far the best way I find in figuring out what Lightroom can see and what it doesn’t is by going to the Library mode and looking at the Folders Menu in the left hand panel. Hover over a folder and right click, then go to ‘Show Parent Folder’. What this does is turn the folder you were hovering over into a sub-folder and its parent folder appears above. To describe this a little more thoroughly; all the files in the computer are ordered into separate subfolders under broader folder or directories. So if we look at the folder name of your pictures folder for instance, it would look something like this: MacHD|Users|YourName|Pictures (if you are using a windows machine there would be a C: directory somewhere there as well is all likelihood). At any rate, when you import directly into Lightroom is doesn’t necessarily show you all the parent directories/folders. This means you can end up having multiple folders of the same year or name. These folders may actually be in completely different locations, but Lightroom muddles this up by putting them all in seemingly in the same folder. By clicking on Show Parent Folder on all the top level folders in Lightroom you can actually see where the folders reside on the computer.
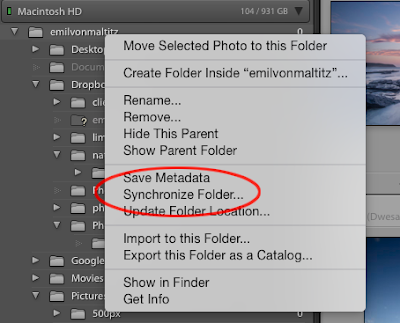
- The single most common telephonic question I get from photographers (and I mean at all hours) is ‘Lightroom can’t see my photos, it’s lost lost them!” The easiest way to find out where those photos are, or if they are indeed lost is to go to the top most folder in your folder tree (possibly the Pictures directory), right clicking and selecting synchronise folder. What this does is compare the images in Lightroom with those on the computer (in the requested folder) and import images which haven’t been imported into Lightroom. It also scans for metadata changes and removes images that are not associated with an image in the computer. The dialogue box that appears when you click on synchronise folder allows you to select what you would like to happen. So, if you don’t want metadata to be changed, you can opt not to tick that box. Most usefully though is that by synchronising the folder you get your files on the computer aligned with the files in Lightroom.
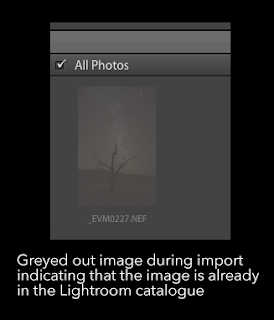
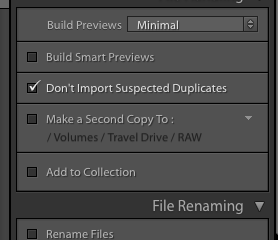 There’s a rub though. Occasionally images will not import, and yet you know they are there in the computer. The primary reason for this is that Lightroom may conclude that the images are ALREADY in its catalogue. The main culprit for this is the tick box in the import dialogue that stops Lightroom from importing suspected duplicates into the catalogue. If your images have the same filename (e.g. DSC_0123.jpg), then Lightroom will not import the second file unless you un-tick the little box that says ‘Do Not Import Suspected Duplicates. This is a very good reason to rename your images as part of your standard workflow. Unfortunately camera manufacturers are still on a pre-21st Century naming convention, meaning that the image frame number on your modern day camera usually only goes up to 9999 and then clocks back over to 0001. Unless you rename your files you will end up with duplicate filenames, and Lightroom doesn’t play so well with them.
Of course there is also the possibility that you do indeed have the actual images already in Lightroom, but in a different folder. Once again, performing a synchronization makes a good start towards figuring out where the actual images are. Sometimes it will take a little bit of graft to clean up your library. However, as much as photographers will curse Lightroom from time to time it does not automatically delete your photos, hide them or unnecessarily squirrel them into different folders to the ones that you originally chose. A simple fix to most people’s problems is to sort out where the original photos are and then get Lightroom sorted.
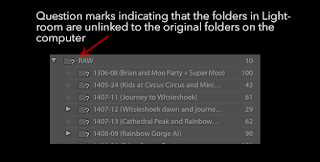 Lastly, is the dreaded exclamation mark (it used to be a question mark in earlier versions of Lightroom). This is the little icon that sits in the top right corner of the thumbnail box when the preview image in Lightroom is no longer associated with the original (RAW) file in the computer’s hard drive. This is usually caused when you have physically moved the photographs to a different folder using the computer system rather than Lightroom, or, the files are on an external hard drive that has been unplugged and then plugged back in (potentially to a different port). The fix for this actually really simple. Click on the exclamation mark and a dialogue box will pop up explaining that the original file could not be found. It gives the option to cancel or locate. Select ‘Locate’ and a system window (finder window) pops up. On Mac at least, simply type in the filename search box and it will hopefully locate where the file is. At the bottom of the window you will also see a tick box for finding nearby selected photos. The same can be done for folders that are disassociated from their actual files. These are indicated by a partially greyed folder icon with a question mark next to it. Again, click not he folder in Lightroom and select ‘Locate’.
There are a few ways in which to keep your Lightroom catalogue neatly ordered:
- Personally, I use a chronological file structure for all my RAW files in the computer itself. These are then imported into the Lightroom catalogue. If I have a logical layout of where my original files are, then it makes it lot easier to work out when there is a disconnect between Lightroom and the originals. I have a post on this in Post-Shoot Workflow.
- Then, when I move files, I use Lightroom to do the lifting. Yes, it can be slower than simply moving the files using the operating system, but by moving files using Lightroom, it maintains the sync between the Lightroom catalogue and the original files. This minimises the amount of exclamation and question marks you are going to see in Lightroom (Remember, Lightroom can only ‘see’ what is imported into it, so moving files in the backgrounds breaks the connection that was made on import whereas moving files within Lightroom maintains that connection).
- Do a regular synchronisation on frequently used folders. This just keeps Lightroom up to date with any changes you have made in the background, whether purposely made or inadvertent.
Lightroom is most certainly not the best tool out there, but for the majority of photographers it is one of the most versatile cataloging applications available. The fact that it is now bundled in the Adobe Photography CC package makes it that more attractive (and significantly cheaper than Phase One’s Capture One Pro). If you can understand how it works it becomes less of the enfant terrible and more of a jack-of-all-trades. It cannot and will not automatically remove, discard or delete files (despite what some exasperated photographers will proclaim in a flurry of expletives). It will only follow instructions, and it needs decent instructions from the user to be able to work most efficiently. By following some of the tips above, hopefully it will be a little easier to figure out where those image actually are, and assist in getting your library of images back into some state of order.


No comments:
Post a Comment