Before getting into the sharpening protocol in Lightroom it’s important to point out that I don’t think LR has the best sharpening abilities available. It works well as a first stage sharpener to rid the camera of any softness caused by the camera’s Anti-Alias filter. Thereafter I recommend using a sharpening protocol in Photoshop which I'll be posting shortly, but is also available on the legacy link here. If you are wanting to sharpen straight from RAW then I would also suggest using either a plugin for Lightroom like Nik’s Sharpener Pro (sadly now discontinued of support, but still working for the time being) or a plugin like that from Topaz Labs.
The joy of LR though is that it does make workflow faster and easier, so even though I don’t have the highest regard for the sharpening tool in LR, I do use it a lot. Adobe have made it easy to want to use LR for sharpening by giving visual tools that are simply not available in most other RAW editors. This is the workflow I use for sharpening within LR:
First, get used to using the Alt/Option button (on both PC or Mac). By pressing this at the same time as using the sliders, the screen changes in order to make ‘eyeballing’ easier. You also need to do all sharpening with the image view at 100% (you need to eyeball this at a pixel by pixel basis).
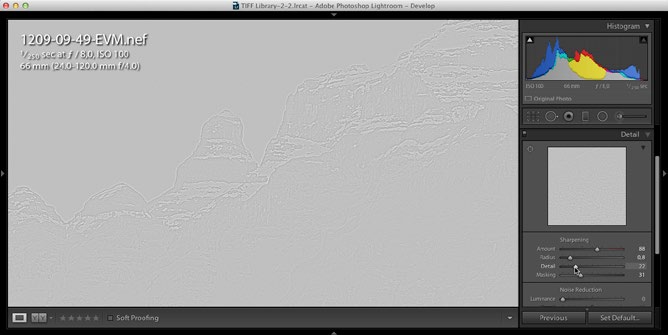
Step 1 - Set the radius to 3. While holding down the Alt button slowly slide the Amount slider to the right. With the Alt button depressed the image will turn to black and white. This makes it slightly easier to see when the details are ‘sharper’ without any jagged edges (which appear when the image is over sharpened). This range usually lies between 60 and 100 on the amount slider. Chances are that if you need more than 100 the image is slightly out of focus to start with.
Step 2 - Holding down the Alt button again move the radius slider to the left (from 3.0). This time the image will look as if a high-pass mask has been applied to it. The idea is to shift the radius amount until there are little or no haloing effects around areas of detail. A ‘halo’ is a brightening around the edge of detail that looks like a kind of inverse shadow. Too much radius and the halo is obvious and the image looks over sharpened. Too little radius and the image doesn’t receive enough sharpening. I usually find a value between 0.7 and 1.0 is effective.
Step 3 - The Detail and Masking sliders are essentially suppression sliders - i.e they mitigate against the negative effects of the Amount and Radius sliders. The Detail slider counteracts the halo effect created by the Radius slider. Holding down the Alt button while adjusting the slider effectively shows the size and strength of the halo around details. By sliding it left you can gradually suppress the strength of the halo. Bear in mind though that by completely suppressing the halo, you also negate any visible sharpening. The default setting of 25 is a good starting point.

Step 4 - Now, still holding the Alt button move to the mask slider and start to slide this across to the right. The problem with sharpening is that it is applied globally across the image. However, areas of broad tone or hue don’t necessarily need sharpening. By applying it to these areas the sharpening tool introduces noise. The mask slider allows LR to avoid sharpening areas where there is limited detail. Areas that will receive sharpening appear as white, while areas that do not receive sharpening will appear as black. This means that when the mask is set to 0, the image will be completely white while the Alt button is depressed. As the slider moves to the right more black will become apparent until there are only thin white lines where the strongest local contrast appears (skylines etc.). The goal is to adjust the mask to a setting that avoids sharpening solid tones (like sky) while sharpening all areas with detail.
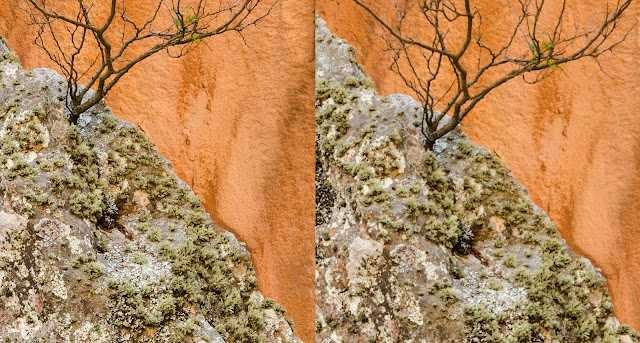
If done carefully, sharpening in LR can work very effectively at removing any smoothness and blurring caused by the AA filter in the camera. Theoretically cameras like the X-trans sensor Fujifilms and the cameras without the AA filter like the Nikon D7100 don’t need sharpening. However, depending on preference, individual photographers may find that these cameras still benefit from mild sharpening. The optimum word is ‘mild’. Don’t try to do too much within LR if at all possible and leave creative sharpening to the brush tool, a plugin or Photoshop.
 | |
| Click on the image to download a larger 100% crop |


No comments:
Post a Comment